Skip to content

Contribute

Summary

Anyone who wishes to monetize their underutilized fiber optic cables and network hardware may contribute to the DoubleZero network. Network contributors must provide dedicated bandwidth between two points, operate DoubleZero compatible devices (DZDs) at each end, and a connection to the public internet at each end. Network contributors must also run DoubleZero software on each DZD to provide services like multicast, user lookup, and edge filtration.

The DoubleZero smart contract is the cornerstone of ensuring that the network maintains high-quality links that can be measured and integrated into the topology, allowing our network controllers to develop the most efficient end-to-end path between our different users and endpoints. Upon execution of the smart contract and deployment of the network equipment and bandwidth, an entity is classified as a network contributor. See DoubleZero Economics to further understand the economics behind participating in DoubleZero as a network contributor.

Requirements to be a DoubleZero Network Contributor

  • Dedicated bandwidth that can provide IPv4 connectivity and an MTU of 2048 bytes between two data centers
  • DoubleZero Device (DZD) hardware that is compatible with the DoubleZero protocol
  • Connectivity to the internet and other DoubleZero network contributors
  • Installation of DoubleZero software on the DZD

Quick Start Guide

As a network contributor, the simplest way to get started in DoubleZero is by identifying capacity in your network that can be dedicated for DoubleZero. Once identified, DZDs must be deployed, facilitating the DoubleZero overlay network which only requires IPv4 reachability and a minimum MTU of 2048 bytes as its dependencies from the contributor’s network.

Figure 1 highlights the simplest model for contributing bandwidth and packet sending and processing services. A DZD is deployed in each data center, interfacing with the network contributor’s internal network to provide DoubleZero WAN connectivity. This is complemented by local internet, typically a Direct Internet Access (DIA) solution, that is used as on-ramps for DoubleZero users. While it is expected that DIA will be the preferred option for facilitating access to users of DoubleZero, numerous connectivity models are possible e.g. physical cabling to servers, network fabric extension, etc. We refer to these options as Choose Your Own Adventure (CYOA), providing the contributor flexibility to connect local or remote users in a way that best fits their internal network policies.

As with any network, reachability is a fundamental part of the architecture as network contributors cannot live in isolation. As such, the DZD must have a link to a DoubleZero Exchange (DZX) to create a contiguous network between participants.

Image title
Figure 1: DoubleZero Network Bandwidth Contribution Between 2 Data Centers - Single Contributor

Example Contributions

The ways in which a network contributor can grow their DoubleZero contributions are many, including:

  • Improve the performance characteristics of their existing contributions: increase bandwidth, reduce latency
  • Add multiple links between the same data centers
  • Add a new link from an existing data center to a new data center
  • Add a new, independent link between two new data centers
Image title
Figure 2: DoubleZero Network Bandwidth Contribution Between 3 Data Centers - Single Contributor

A single DZD can support multiple links contributed to DoubleZero. Figure 2 illustrates a potential topology if a single data center, denoted as 1, terminates bandwidth to two different remote data centers 2 and 3. In this scenario, each data center contains only 1 DZD. All DZDs are using DIA for user on-ramps as their CYOA interface.

Figure 3 describes the DoubleZero topology when a single contributor deploys three links in a triangle topology between 3 data centers. In a scenario similar to example 1, a single DZD is deployed in data centers 1, 2 and 3, each supporting 2 independent network links. The resulting topology is a triangle or ring between data centers.

Image title
Figure 3: DoubleZero Network Bandwidth Contribution Between 3 Data Centers - Single Contributor

DoubleZero Exchange

The creation of a contiguous network is a fundamental building block of the DoubleZero architecture. Contributors interface via a DoubleZero Exchange (DZX) within a metropolitan area, which is a city such as New York (NYC), London (LON) or Tokyo (TYO). A DZX is a network fabric similar to an Internet Exchange, allowing peering and route exchange.

In figure 4, network contributor 1 operates in data centers 1, 2 and 3, while network contributor 2 operates in data centers 2, 4 and 5. By interconnecting in data center 2, the DoubleZero network reach increases to 5 contiguous data centers.

Image title
Figure 4: DoubleZero Network Bandwidth Contribution Between 2 Network Bandwidth Contributors

Bandwidth Contribution Options

DoubleZero requires a network contributor to offer integrated connectivity via a guaranteed bandwidth, latency and jitter profile between DZDs at two terminating data centers expressed via a smart contract. DoubleZero does not mandate how a network contributor implements their contribution, however, in the following sections we provide indicative options for use at their sole discretion.

Important areas to consider for a network contributor might be:

  • Ability to guarantee network performance of the DoubleZero service: bandwidth, latency, and jitter
  • Segregation from their existing internal network services
  • IPv4 addressing clashes, specifically with the tunnel underlay address space
  • Uptime and availability
  • CAPEX and OPEX considerations

Layer 1 Bandwidth

Image title
Figure 5: Layer 1 Optical Services

Layer 1 bandwidth, more formally described as wavelength services, may see dedicated capacity provisioned on an existing optical infrastructure, such as DWDM, CWDM or via optical multiplexers (MUX). In figure 5, the DZDs use a colored optic that is cabled to an L1 MUX, which interleaves the DZD wavelength on to an existing dark fiber.

This solution has numerous benefits for network contributors who already operate an existing core network. The iterative operational changes, as well as additional CAPEX and OPEX requirements, are modest. This option is particularly robust in offering segregation from the network contributor's network services.

Packet Switched Bandwidth

Packet switched networks can be considered a typical enterprise network, running standard routing and switching protocols supporting business applications. There are numerous networking technologies that achieve connectivity, for example, layer 2 (L2) extensions using VLAN tags.

L2 Extension
Image title
Figure 6: Packet Switched Networks - L2 Extension

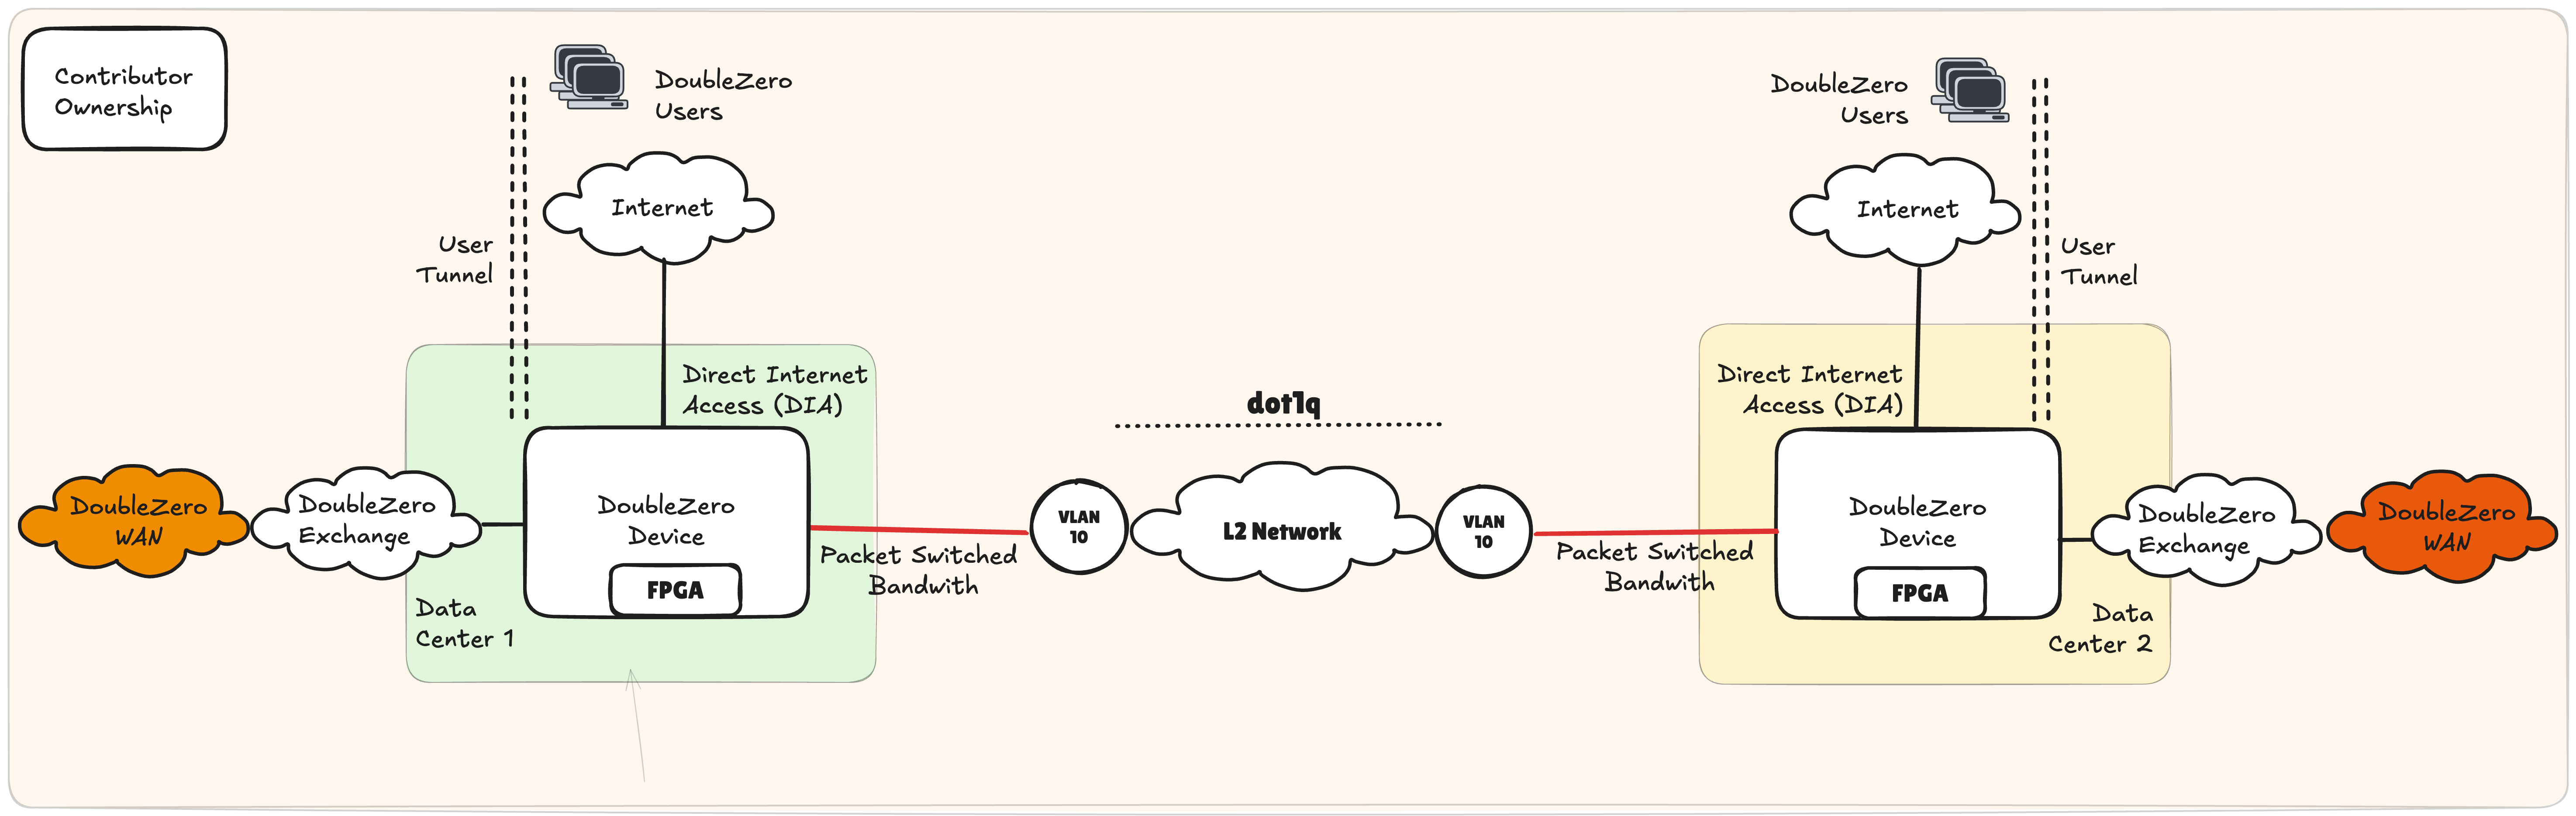
An L2 extension as shown in Figure 6 can be facilitated through VLAN tagging. A DZD’s port can be cabled to a contributor’s internal network switch, with the switch port being set as an access port in, for example, VLAN 10. Through 802.1q tagging, this VLAN can be carried over multiple switch-hops on the contributor’s network, terminating at the switch interfacing with the remote DZD.

This solution benefits from being widely supported and relatively easy to implement while creating segmentation between DoubleZero and internal layer 3 services. Bandwidth can be controlled based on the interface speed of the contributor’s internal switch or router. Careful consideration must be given to performance across the shared internal L2 network through technologies such as Quality of Service (QoS) or other traffic management policies. However, additional CAPEX and OPEX investments should be modest if existing capacity is available within the contributor’s core network.

Dedicated 3rd Party Bandwidth

Image title
Figure 7: Dedicated 3rd Party Bandwidth

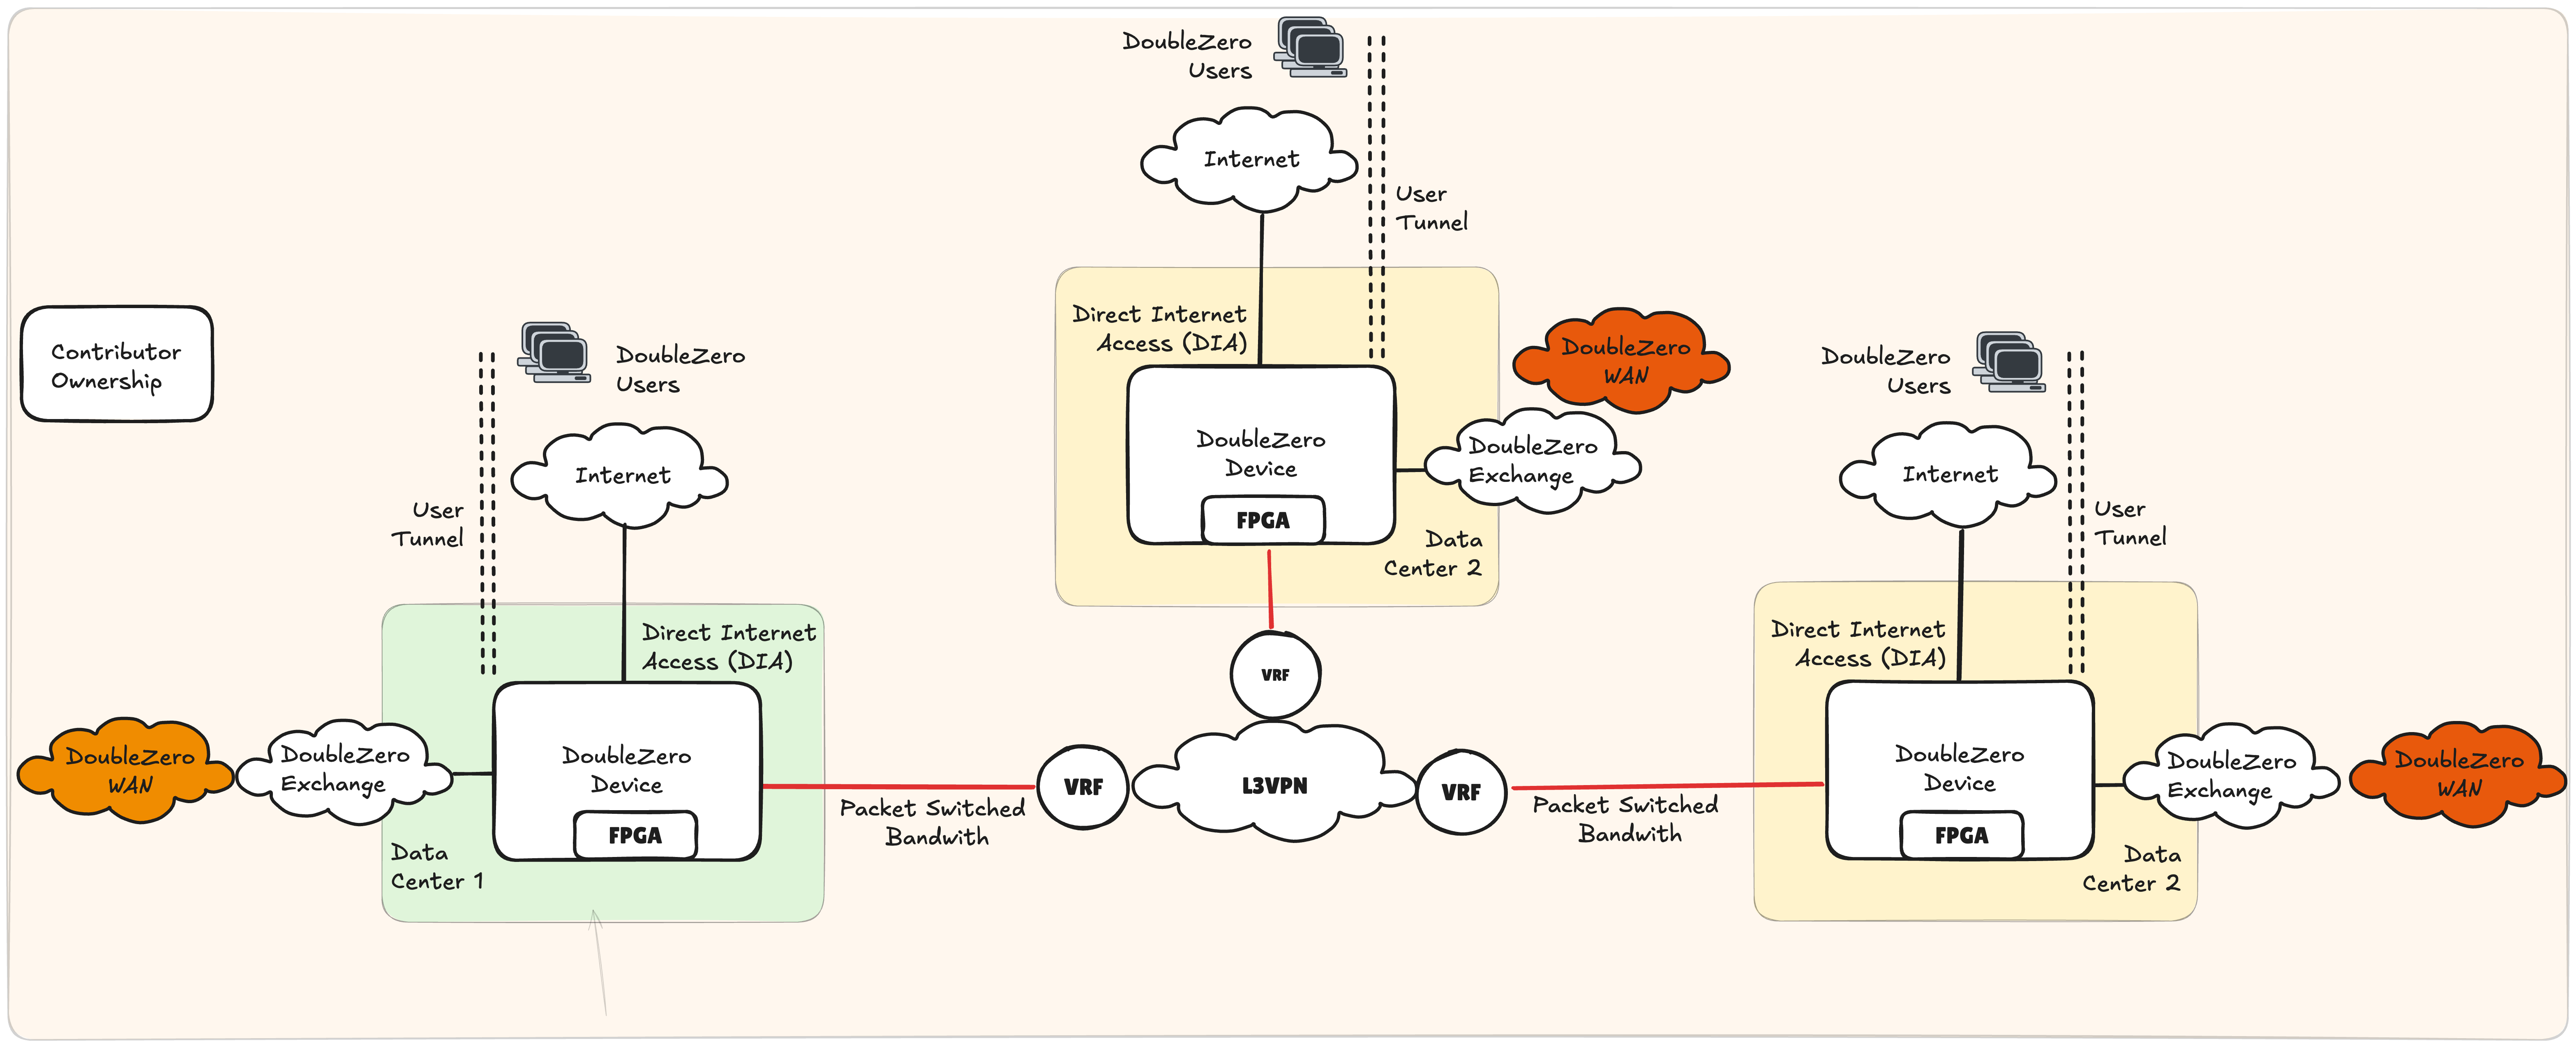
While reusing available capacity will be attractive to many network contributors, one can also dedicate newly acquired bandwidth to DoubleZero. In such a scenario, the DZD would connect directly to the 3rd party carrier without any internal devices of the contributor sitting inline (figure 7).

This option is attractive as it ensures dedicated bandwidth for DoubleZero, is simple operationally and ensures complete segmentation from any other network services. This option will likely have the highest OPEX increase and requires new service contracts with 3rd party carriers.

Install Guide

Indicative Hardware Requirements - 100Gbps Bandwidth Contribution

Note that quantities below reflect equipment needed in two data centers, i.e. the total required hardware necessary to deploy 1 fiber optic cable for bandwidth contribution.

*All FPGAs are subject to final testing. 10G contributions may be supported using Arista 7130LBR switches with inbuilt dual Virtex® UltraScale+™ FPGAs (please discuss with the DoubleZero Foundation / Malbec Labs).

Function & Port Requirements

Function Port Speed DZ Requirement QTY Note
Private Bandwidth 100G Yes 1
Direct Internet Access (DIA) 10G Yes 2
DoubleZero eXchange (DZX) 100G Yes* 1 Must be supported once more than 3 providers operate in the same metro area, preceding this, cross-connects or other peering arrangements can be used to interconnect to other providers.
Management No 1 Determined by contributor's own internal management policies.
Console No 1 Determined by contributor's own internal management policies.

DZD Network Hardware

Make Model Part Number DZ Requirement QTY Note
AMD* V80* 24540474 Yes 4
Arista 7280CR3A DCS-7280CR3A-32S Yes 2 Alternatives may be possible if lead times are challenging.

Optics - 100G

Make Model Part Number DZ Requirement QTY Note
Arista 100GBASE-LR QSFP-100G-LR No 16 Cabling and optic choice available at contributor's discretion. 100G required to connect FPGAs.

Optics - 10G

Make Model Part Number DZ Requirement QTY Note
Arista 10GBASE-LR SFP-10G-LR No 2 Cabling and optic choice available at contributor's discretion.
Finisar DynamiX QSA™ MAM1Q00A-QSA No 2 Cabling and optic choice available at contributor's discretion.

IP Addressing

IP Addressing Minimum Subnet Size DZ Requirement Note
Public IPv4 /29 Yes (for edge/hybrid DZDs) Must be routable via DIA. We may eliminate the need for this over time.

Please ensure that the full /29 pool is available for the DZ protocol. Any requirements for point-to-point addressing, e.g., on DIA interfaces, should be managed via a different address pool.

Indicative Hardware Requirements - 10Gbps Bandwidth Contribution

Note that quantities reflect two data centers' equipment i.e. the total required hardware necessary to deploy 1 bandwidth contribution.

Function & Port Requirements

Function Port Speed DZ Requirement QTY Note
Private Bandwidth 10G Yes 1
Direct Internet Access (DIA) 10G Yes 2
DoubleZero eXchange (DZX) 100G Yes* 1 Must be supported once more than 3 providers operate in the same metro area; preceding this, cross-connects or other peering arrangements can be used to interconnect to other providers.
Management No 1 Determined by contributor's own internal management policies.
Console No 1 Determined by contributor's own internal management policies.

Hardware

Make Model Part Number DZ Requirement QTY Note
AMD* V80* 24540474* Yes 4
Arista 7280CR3A DCS-7280CR3A-32S Yes 2 Alternatives may be possible if lead times are challenging.

Optics - 100G

Make Model Part Number DZ Requirement QTY Note
Arista 100GBASE-LR QSFP-100G-LR No 14 Cabling and optic choice available at contributor's discretion. 100G required to connect FPGAs.

Optics - 10G

Make Model Part Number DZ Requirement QTY Note
Arista 10GBASE-LR SFP-10G-LR No 4 Cabling and optic choice available at contributor's discretion.
Finisar DynamiX QSA™ MAM1Q00A-QSA No 4 Cabling and optic choice available at contributor's discretion.
---

IP Addressing

IP Addressing Minimum Subnet Size DZ Requirement Note
Public IPv4 /29 Yes (for edge/hybrid DZDs) Must be routable via DIA. We may eliminate the need for this over time.

Please ensure that the full /29 pool is available for the DZ protocol. Any requirements for point-to-point addressing, e.g., on DIA interfaces, should be managed via a different address pool.

Data Center Requirements

Rack & Power Requirements

Requirement Specification
Rack Space 4U
Power 4KW (recommended)

Onboarding Process

During the onboarding process, each contributor must provide a public key called the service key that will be used to interact with the DoubleZero CLI. This key will serve as the primary identity for executing network operations such as:

  • Creating devices
  • Establishing links between devices and contributors

The service key must be generated and securely stored by the contributor before it is submitted to the DoubleZero Foundation for authorization. This ensures that all CLI interactions can be cryptographically verified and associated with the correct contributor account.

Contributors are responsible for safeguarding the private key associated with the provided service key. Loss or compromise of this key may result in service disruption and will require a re-onboarding process.

These are the steps for creating the different accounts in DoubleZero to manage the network and interconnect it with other contributors.

flowchart LR
    A[Create Keys] -->C[Install Device]
    C --> D[Create Device]
    D --> J[Install Config Agent]
    D --> K[Install Telemetry Agent]
    D --> E[Create Device Interfaces]
    E --> F[Create WAN Link]
    E --> G[Create DZX Link]
    F --> H[Accept DZX Link]

Create Keys

Each contributor has a private key used to send commands to DoubleZero. They also have a keypair that the agent uses to send metrics to the smart contracts, which store them and later process them to execute the rewards process.

  1. Generate the service key (one-time, not per device)

Use your preferred tool or the CLI:

doublezero keygen
  1. Generate the metrics (telemetry) key (one-time, not per device)
doublezero keygen -o ~/.config/doublezero/metrics-publisher.json

Device Installation – Physical and Logical Setup

This section describes the steps for installing and configuring a device for operation within the DoubleZero network. DoubleZero provides an initial configuration recommendation, available in the official repositories, which should be reviewed and applied as part of the setup process.

  • Install the device in the data center rack, ensuring correct airflow.
  • Connect with redundant power feeds to ensure uptime.

2. Initial Network Access

  • Establish management connectivity to the device.
  • Configure Internet access.
  • Discuss with DoubleZero Foundation / Malbec Labs

Device Creation

An authorized contributor can create their devices using the following command:

doublezero device create [OPTIONS] --code <CODE> --contributor <CONTRIBUTOR> --location <LOCATION> --exchange <EXCHANGE> --public-ip <PUBLIC_IP> --dz-prefixes <DZ_PREFIXES>

Options:

--code <CODE>                            Unique device code
--contributor <CONTRIBUTOR>              Contributor (pubkey or code)
--location <LOCATION>                    Location (pubkey or code)
--exchange <EXCHANGE>                    Exchange (pubkey or code)
--public-ip <PUBLIC_IP>                  Device public IPv4 address
--dz-prefixes <DZ_PREFIXES>              List of DZ prefixes in CIDR format
--metrics-publisher <METRICS_PUBLISHER>  Metrics publisher public key (optional)
--mgmt-vrf <MGMT_VRF>                    Management VRF name (optional)

When running this command, the contributor must provide detailed information about the device to be connected to the DoubleZero Network.

Viewing Available Locations

doublezero location list

Viewing Available Exchanges

doublezero exchange list

Example: Creating a Device for Contributor co01

doublezero device create \
  --code lax-dz001 \
  --contributor co01 \
  --location lax \
  --exchange xlax \
  --public-ip "1.2.3.4" \
  --dz-prefixes "100.0.0.0/16" \
  --metrics-publisher <PUBKEY>

Creating Interfaces on a Device

doublezero device interface create [OPTIONS] <DEVICE> <NAME>

Example:

doublezero device interface create \
  lax-dz01 Ethernet1/1

⚠️ Note: There is a current requirement to create two loopback interfaces to support internal DZ routing protocols:

doublezero device interface create lax-dz001 Loopback255 --loopback-type vpnv4
doublezero device interface create lax-dz001 Loopback256 --loopback-type ipv4

Listing Device Interfaces

doublezero device interface list <DEVICE>

Deleting a Device Interface

doublezero device interface delete [OPTIONS] <DEVICE> <NAME>

⚠️ Note: Deleting an interface that is currently in use may cause service disruption.


Links are used to interconnect devices:

  • WAN Links – Between devices of the same contributor.
  • DZX Links – Between devices from different contributors.

⚠️ DZX links must be explicitly accepted by the second contributor.

doublezero link create wan [OPTIONS] \
  --code <CODE> \
  --contributor <CONTRIBUTOR> \
  --side-a <SIDE_A> \
  --side-a-interface <SIDE_A_INTERFACE> \
  --side-z <SIDE_Z> \
  --side-z-interface <SIDE_Z_INTERFACE> \
  --bandwidth <BANDWIDTH> \
  --mtu <MTU> \
  --delay-ms <DELAY_MS> \
  --jitter-ms <JITTER_MS>
doublezero link list
doublezero link create dzx [OPTIONS] \
  --code <CODE> \
  --contributor <CONTRIBUTOR> \
  --side-a <SIDE_A> \
  --side-a-interface <SIDE_A_INTERFACE> \
  --side-z <SIDE_Z> \
  --bandwidth <BANDWIDTH> \
  --mtu <MTU> \
  --delay-ms <DELAY_MS> \
  --jitter-ms <JITTER_MS>
doublezero link accept [OPTIONS] \
  --code <CODE> \
  --side-z-interface <SIDE_Z_INTERFACE>
doublezero link delete --pubkey <PUBKEY>

⚠️ Important: - Please discuss with either DZF and/or Malbec Labs before deleting an existing production link.

Edge / Transit / Hybrid Devices

A device can operate in 3 modes of operation: - Edge – provides at least 1 CYOA connection and 1 DZX connection - Transit – provides at least 2 WAN links and at least 1 DZX connection - Hybrid – provides at least 1 CYOA connection and at least 1 WAN link

A device can be transitioned to an edge device by setting max-users to 0

doublezero device update --pubkey <PUBKEY> --max-users 0

DoubleZero Config Agent Installation

Prerequisites

  1. Supported network hardware: Arista Networks 7130LBR and 7280CR3A switches (see above).
  2. Admin access to the Arista switch(es) that will be joining the DoubleZero network.
  3. Each device's DoubleZero public key, generated by running the command doublezero device create.
  4. Determine which Arista routing instance the agent will use to connect to the DoubleZero Controller. If you can ping the controller with ping <W.X.Y.Z> where W.X.Y.Z is the IP address of the DoubleZero Controller, you will use the default routing instance, named default. If you need to specify a VRF, for example with ping vrf management <W.X.Y.Z>, then your routing instance would be management.

Agent Installation Steps

Use these steps if your DoubleZero Agent will connect to the DoubleZero Controller using Arista's default routing instance.

  1. To allow agents running on the local devices, including doublezero-agent, to call the local device's API, enter the following into the EOS configuration:

    !
    ! Replace the word "default" with the VRF name identified in prerequisites step 4
    !
    management api eos-sdk-rpc
        transport grpc eapilocal
            localhost loopback vrf default
            service all
            no disabled
    

  2. Download and install the current stable doublezero-agent binary package

    a. As admin on the EOS CLI, run the bash shell command and then enter the following commands:

        switch# bash
        $ sudo bash
        # cd /mnt/flash
        # wget https://dl.cloudsmith.io/public/malbeclabs/doublezero/rpm/any-distro/any-version/x86_64/doublezero-agent_<X.Y.Z>_linux_amd64.rpm
        # exit
        $ exit
    

    Note

    You can find more info about Arista EOS extensions here

    b. Back on the EOS CLI, set up the agent

        switch# copy flash:doublezero-agent_<X.Y.Z>_linux_amd64.rpm extension:
        switch# extension doublezero-agent_<X.Y.Z>_linux_amd64.rpm
        switch# copy installed-extensions boot-extensions
    
    c. Verify the extension

    The Status should be "A, I, B".

        switch# show extensions
        Name                                        Version/Release     Status     Extension
        ------------------------------------------- ------------------- ---------- ---------
        doublezero-agent_<X.Y.Z>_linux_amd64.rpm    X.Y.Z/1             A, I, B    1
    
        A: available | NA: not available | I: installed | F: forced | B: install at boot
    

  3. To set up and start the agent, go back to EOS command line, add the following to the Arista EOS configuration: a. Configure the doublezero-agent

    !
    ! If the VRF name identified in prerequisites step 4 is not "ns-default", prefix the following
    ! exec command with `exec /sbin/ip netns exec <vrf>`
    ! For example:
    ! exec /sbin/ip netns exec ns-management /usr/local/bin/doublezero-agent -pubkey <PUBKEY>
    !
    daemon doublezero-agent
    exec /usr/local/bin/doublezero-agent -pubkey <PUBKEY>
    no shut
    
    b. Verify that the agent is working When the agent is up and running you should see the following log entries:
    switch# ceos2#show agent doublezero-agent logs
    2025/01/21 18:17:52 main.go:71: Starting doublezero-agent
    2025/01/21 18:17:52 main.go:72: doublezero-agent controller: 18.116.166.35:7000
    2025/01/21 18:17:52 main.go:73: doublezero-agent sleep-interval-in-seconds: 5.000000
    2025/01/21 18:17:52 main.go:74: doublezero-agent controller-timeout-in-seconds: 2.000000
    2025/01/21 18:17:52 main.go:75: doublezero-agent pubkey: 111111G5zfGFHe9aek69vLPkXTZnkozyBm468PhitD7U
    2025/01/21 18:17:52 main.go:76: doublezero-agent device: 127.0.0.1:9543
    2025/01/21 18:17:52 dzclient.go:32: controllerAddressAndPort 18.116.166.35:7000
    

Agent Upgrade Steps

  1. Download the latest version of agent:

    switch# bash
    $ sudo bash
    # cd /mnt/flash
    # wget https://dl.cloudsmith.io/public/malbeclabs/doublezero/rpm/any-distro/any-version/x86_64/doublezero-agent_<X.Y.Z>_linux_amd64.rpm
    # exit
    $ exit
    

  2. Back on the EOS CLI, remove the old version First, find the filename of the old version, similar to the new version downloaded but one or more versions behind the new one: doublezero-agent_<W.X.Y>_linux_amd64.rpm

    switch# show extensions
    
    Run the following commands to remove the old version. Replace the filenames below with the one from the show extensions command above.
    switch# delete flash:doublezero-agent_<W.X.Y>_linux_amd64.rpm
    switch# delete extension:doublezero-agent_<W.X.Y>_linux_amd64.rpm
    

  3. Set up the new agent version

    switch# copy flash:doublezero-agent_<X.Y.Z>_linux_amd64.rpm extension:
    switch# extension doublezero-agent_<X.Y.Z>_linux_amd64.rpm
    switch# copy installed-extensions boot-extensions
    

  4. Verify the extension

    The Status should be "A, I, B".

    switch# show extensions
    Name                                        Version/Release    Status     Extension
    ------------------------------------------- ------------------ ---------- ---------
    doublezero-agent_<X.Y.Z>_linux_amd64.rpm    <X.Y.Z>/1          A, I, B    1
    
    A: available | NA: not available | I: installed | F: forced | B: install at boot
    

Verify Agent Log Output

show agent doublezero-agent log

DoubleZero Telemetry Agent Installation

Prerequisites

  1. Supported network hardware: Arista Networks 7130 and 7280 switches (see above).
  2. Admin access to the Arista switch(es) that will be joining the DoubleZero network.
  3. Each device's DoubleZero account. This is visible in doublezero device list following the device's creation.
  4. Determine which Arista routing instance the agent will use to connect to the DoubleZero Ledger. If you can ping the ledger with ping doublezero-mainnet-beta.rpcpool.com, you will use the default routing instance, named default. If you need to specify a VRF, for example with ping vrf management doublezero-mainnet-beta.rpcpool.com, then your routing instance would be management.

Agent Installation Steps

Use these steps if your DoubleZero Agent will connect to the DoubleZero Controller using Arista's default routing instance.

  1. Install a metrics publisher keypair

    a. Outside of the device, generate a keypair:

    doublezero keygen -o -o ~/.config/doublezero/metrics-publisher.json
    

    b. Save the keypair on the device at /mnt/flash/metrics-publisher-keypair.json

    scp ~/.config/doublezero/metrics-publisher.json <DZD>:/mnt/flash/metrics-publisher-keypair.json
    

    c. Register it onchain on the DoubleZero ledger:

    doublezero device update --pubkey <DEVICE_ACCOUNT> --metrics-publisher <METRICS_PUBLISHER_PUBKEY>
    
  2. Download and install the current stable doublezero-telemetry binary package

    a. As admin on the EOS CLI, run the bash shell command and then enter the following commands:

    switch# bash
    $ sudo bash
    # cd /mnt/flash
    # wget https://dl.cloudsmith.io/public/malbeclabs/doublezero/rpm/any-distro/any-version/x86_64/doublezero-device-telemetry-agent_<X.Y.Z>_linux_amd64.rpm
    # exit
    $ exit
    

    Note

    You can find more info about Arista EOS extensions here

    b. Back on the EOS CLI, set up the agent

    switch# copy flash:doublezero-device-telemetry-agent_<X.Y.Z>_linux_amd64.rpm extension:
    switch# extension doublezero-device-telemetry-agent_<X.Y.Z>_linux_amd64.rpm
    switch# copy installed-extensions boot-extensions
    

    c. Verify the extension

    The Status should be "A, I, B".

    switch# show extensions
    Name                                                      Version/Release     Status     Extension
    --------------------------------------------------------- ------------------- ---------- ---------
    doublezero-device-telemetry-agent_<X.Y.Z>_linux_amd64.rpm    X.Y.Z/1             A, I, B    1
    
    A: available | NA: not available | I: installed | F: forced | B: install at boot
    
  3. To set up and start the agent, go back to EOS command line, add the following to the Arista EOS configuration: a. Configure the doublezero-telemetry

    !
    ! If the VRF name identified in prerequisites step 4 is not "ns-default", include a CLI arg of
    ! `--management-namespace <vrf>` on the following `exec` command.
    ! For example:
    ! exec /usr/local/bin/doublezero-telemetry --management-namespace ns-management ...
    !
    daemon doublezero-telemetry
    exec /usr/local/bin/doublezero-telemetry --local-device-pubkey <DEVICE_ACCOUNT> --env mainnet --keypair /mnt/flash/metrics-publisher-keypair.json
    no shut
    
    b. Verify that the agent is working When the agent is up and running you should see the following log entries:
    switch# ceos2#show agent doublezero-telemetry logs
    time=2025-08-18T18:54:04.341Z level=INFO msg="Starting telemetry collector" twampReflector=0.0.0.0:862 localDevicePK=<DEVICE_ACCOUNT> probeInterval=10s submissionInterval=1m0s
    time=2025-08-18T18:54:04.342Z level=INFO msg="Starting peer discovery" refreshInterval=10s
    time=2025-08-18T18:54:04.342Z level=INFO msg="Starting submission loop" interval=1m0s maxRetries=5 metricsPublisherPK=<METRICS_PUBLISHER_PUBKEY>
    time=2025-08-18T18:54:04.342Z level=INFO msg="Starting probe loop"
    time=2025-08-18T18:54:14.363Z level=DEBUG msg="Refreshed peers" devic
    

Agent Upgrade Steps

  1. Download the latest version of telemetry agent:

    switch# bash
    $ sudo bash
    # cd /mnt/flash
    # wget https://dl.cloudsmith.io/public/malbeclabs/doublezero/rpm/any-distro/any-version/x86_64/doublezero-device-telemetry-agent_<X.Y.Z>_linux_amd64.rpm
    # exit
    $ exit
    
  2. Back on the EOS CLI, remove the old version

    First, find the filename of the old version, similar to the new version downloaded but one or more versions behind the new one: doublezero-device-telemetry-agent_<W.X.Y>_linux_amd64.rpm

    switch# show extensions
    

    Run the following commands to remove the old version. Replace the filenames below with the one from the show extensions command above.

    switch# delete flash:doublezero-device-telemetry-agent_<W.X.Y>_linux_amd64.rpm
    switch# delete extension:doublezero-device-telemetry-agent_<W.X.Y>_linux_amd64.rpm
    
  3. Set up the new agent version

    switch# copy flash:doublezero-device-telemetry-agent_<X.Y.Z>_linux_amd64.rpm extension:
    switch# extension doublezero-device-telemetry-agent_<X.Y.Z>_linux_amd64.rpm
    switch# copy installed-extensions boot-extensions
    
  4. Verify the extension

    The Status should be "A, I, B".

    switch# show extensions
    Name                                                      Version/Release    Status     Extension
    --------------------------------------------------------- ------------------ ---------- ---------
    doublezero-device-telemetry-agent_<X.Y.Z>_linux_amd64.rpm    <X.Y.Z>/1          A, I, B    1
    
    A: available | NA: not available | I: installed | F: forced | B: install at boot
    

Verify Agent Log Output

show agent doublezero-telemetry log

Monitoring

⚠️ Important:

  1. For the configuration examples below, please be mindful of whether your agents are using a management VRF.
  2. The configuration agent and telemetry agent use the same listening port (:8080) for their metrics endpoint by default. If you are enabling metrics on both, use the -metrics-addr flag to set unique listening ports for each agent.

Configuration Agent

The configuration agent on the DoubleZero device has the ability to expose prometheus compatible metrics by setting the -metrics-enable flag in the doublezero-agent daemon configuration. The default listening port is tcp/8080 but can be changed to suit the environment via the -metrics-addr:

daemon doublezero-agent
   exec /usr/local/bin/doublezero-agent -pubkey $PUBKEY -controller $CONTROLLER_ADDR -metrics-enable -metrics-addr 10.0.0.11:2112
   no shutdown

The following DoubleZero specific metrics are exposed along with go-specific runtime metrics:

$ curl -s 10.0.0.11:2112/metrics | grep doublezero

# HELP doublezero_agent_apply_config_errors_total Number of errors encountered while applying config to the device
# TYPE doublezero_agent_apply_config_errors_total counter
doublezero_agent_apply_config_errors_total 0

# HELP doublezero_agent_bgp_neighbors_errors_total Number of errors encountered while retrieving BGP neighbors from the device
# TYPE doublezero_agent_bgp_neighbors_errors_total counter
doublezero_agent_bgp_neighbors_errors_total 0

# HELP doublezero_agent_build_info Build information of the agent
# TYPE doublezero_agent_build_info gauge
doublezero_agent_build_info{commit="4378018f",date="2025-09-23T14:07:48Z",version="0.6.5~git20250923140746.4378018f"} 1

# HELP doublezero_agent_get_config_errors_total Number of errors encountered while getting config from the controller
# TYPE doublezero_agent_get_config_errors_total counter
doublezero_agent_get_config_errors_total 0
The following are high signal errors:

  • up - This is the timeseries metric automatically generated by prometheus if the scrape instance is healthy and reachable. If it is not, either the agent is not reachable or the agent is not running.
  • doublezero_agent_apply_config_errors_total - The configuration attemping to be applied by the agent failed. In this situation, users will not be able to onboard to the device and onchain configuration changes will not be applied until this is resolved.

  • doublezero_agent_get_config_errors_total - This signals that the local configuration agent can't talk to the DoubleZero controller. In most cases, this can be due to an issue with management connectivity on the device. Similar to the metric above, users will not be able to onboard to the device and onchain configuration changes will not be applied until this is resolved.

Telemetry Agent

The telemetry agent on the DoubleZero device has the ability to expose prometheus compatible metrics by setting the -metrics-enable flag in the doublezero-telemetry daemon configuration. The default listening port is tcp/8080 but can be changed to suit the environment via the -metrics-addr:

daemon doublezero-telemetry
   exec /usr/local/bin/doublezero-telemetry  --local-device-pubkey $PUBKEY --env $ENV --keypair $KEY_PAIR -metrics-enable --metrics-addr 10.0.0.11:2113
   no shutdown

The following DoubleZero specific metrics are exposed along with go-specific runtime metrics:

$ curl -s 10.0.0.11:2113/metrics | grep doublezero

# HELP doublezero_device_telemetry_agent_build_info Build information of the device telemetry agent
# TYPE doublezero_device_telemetry_agent_build_info gauge
doublezero_device_telemetry_agent_build_info{commit="4378018f",date="2025-09-23T14:07:45Z",version="0.6.5~git20250923140743.4378018f"} 1

# HELP doublezero_device_telemetry_agent_errors_total Number of errors encountered
# TYPE doublezero_device_telemetry_agent_errors_total counter
doublezero_device_telemetry_agent_errors_total{error_type="peer_discovery_program_load"} 7
doublezero_device_telemetry_agent_errors_total{error_type="submitter_failed_to_write_samples"} 8
doublezero_device_telemetry_agent_errors_total{error_type="collector_submit_samples_on_close"} 0
doublezero_device_telemetry_agent_errors_total{error_type="peer_discovery_getting_local_interfaces"} 0
doublezero_device_telemetry_agent_errors_total{error_type="peer_discovery_finding_local_tunnel"} 0
doublezero_device_telemetry_agent_errors_total{error_type="peer_discovery_link_tunnel_net_invalid"} 0
doublezero_device_telemetry_agent_errors_total{error_type="submitter_failed_to_initialize_account"} 0
doublezero_device_telemetry_agent_errors_total{error_type="submitter_retries_exhausted"} 0

# HELP doublezero_device_telemetry_agent_peer_discovery_not_found_tunnels Number of local tunnel interfaces not found during peer discovery
# TYPE doublezero_device_telemetry_agent_peer_discovery_not_found_tunnels gauge
doublezero_device_telemetry_agent_peer_discovery_not_found_tunnels{local_device_pk="8PQkip3CxWhQTdP7doCyhT2kwjSL2csRTdnRg2zbDPs1"} 0
The following are high signal errors:

  • up - This is the timeseries metric automatically generated by prometheus if the scrape instance is healthy and reachable. If it is not, either the agent is not reachable or the agent is not running.
  • doublezero_device_telemetry_agent_errors_total with an error_type of submitter_failed_to_write_samples - This is a signal the telemetry agent can't write samples onchain, which could be do to management connectivity issues on the device.